Learn C language

Easy to learn C language tutorials

Learn C++ language

Easy to learn C++ language tutorials

Learn Core Java language

Easy to learn Java language tutorials

Learn HTML

Easy to learn HTML tutorials

Learn CSS

Easy to learn CSS tutorials

Learn ASP.NET

Easy to learn ASP.NET tutorials

Showing posts with label HTML Guide. Show all posts

Wednesday, August 7, 2013

[Part-10] HTML : Usemap


If you have not read my previous posts of HTML then read it for better understating of today's HTML post.


In today's post I will tell you about usemap . Usemap is an image attribute it is used to create clickable areas on an image. There are three types of shapes are used in usemap i.e. circle, rectangle, polygon. We use coordinates to create these shape. For circle we use three coordinates,  in rectangle we use four coordinates and in polygon there is no fixed limit for coordinates. You will better understand these things when you see an example so, follow the below steps to see the usemap's working :-
  • Open notepad or notepad++.
  • Write or copy and paste below given HTML code.
  • Then save the below given image.
Button


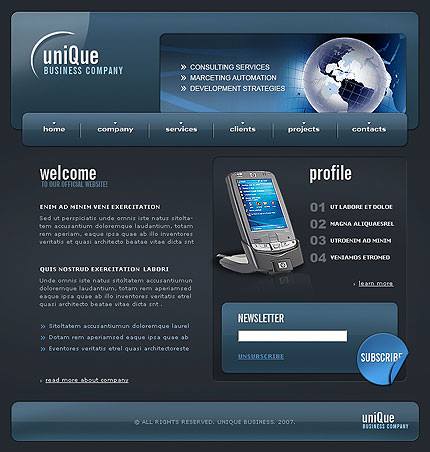
  • Then copy the image location with image name and paste it in our given HTML code in place of this "/mysite/b.jpg".
  • In HTML code you have also seen that there is usemap="#buttonmap" and <map name="buttonmap"> is written if you want to change the name just replace the highlighted text with the name that you want to give.
  • If you want to change the size of circle, polygon and rectangle then you need to change this highlighted part coords="345,78,40" according to the shape you have given.
  • Now save it as anyname.html
  • Then open it with browser.
  • You will notice when you open it and after that when you click on the image (Means on the earth image which is created on the image)you will goto another site this is done by using usemap and if you to change the link then in HTML code just change the highlighted part href="/mysite/company.htm"
  • You have also seen that on the image (Means NEWSLETTER written on the image)this area is also clickable in this we use rectangle shape and on when you click on the image corners (Means SUBSCRIBE written on the image) that areas are also clickable here we use polygon shape.
  • When you want to end the usemap place this tag </map> in the ending.
HTML Code :-


See the below video for better understanding of usemap :-


If you have any doubt post in the comment box.

For more updates like us on Facebook.

Monday, August 5, 2013

[Part-8] HTML : Font Tag

If you have not read my previous posts of HTML then read it for better understating of today's HTML post.


In today's post I will tell you how to change the text font, size, color, etc.

Just follow the some very simple and easy steps to do this :-


  • Open notepad or notepad++.
  • Write or copy and paste the below given HTML code.
  • Then save as anyname.html.
  • Now open the saved file in browser.
  • You notice that the text font, size, color and background color are changed.
  • To change all of this thing we use <font></font> and also some attributes of it.
  • The attribute we use are size="50px" color="darkred" font face="cooper black".
  • You can change values of  size, font face and color.
  • You have also notice that background color is changed.
  • This is done by using attribute with body.
  • Attribute used with body is bgcolor="lightgreen".
  • If you want to give any other color to the background then just change value "bgcolor" with other color.
  • You have seen that all the matter is in center.
  • This is done by using <center></center>.
  •  When you write or place anything between <center></center> it comes in the center.
HTML Code :-


Output :-


For better understanding see the below video :-


If you have any doubt just post in the comment box.

For more updates like us on Facebook.


Sunday, August 4, 2013

[Part-7] HTML : Move Image and Text

In today's post I will tell you about that how can you move image or text in HTML. We can move images and text using <marquee></marquee> anything whether it is image or text if placed between the <marquee></marquee> it will starts moving, as shown below :-

Programming Skills

Now follow below steps to move image or text :-


  • Firstly open notepad or notepad++.
  • Write or copy and paste below given HTML code.
  • Then save as anyname.html.
  • Open with browser and your image and text starts moving.
  • If you want to change the moving direction of image or text then we use direction attribute of <marquee></marquee>.
  • We can move text or image in four direction i.e. left,right,up and down.
  • When you run our given HTML code then you will better understand the use of direction attribute.
  • Another attribute of <marquee></marquee> is behavior, there are three values of behavior i.e. alternate, scroll, slide.
  • When you run our given HTML code then you will better understand the use of behavior attribute.
  • Below you are seeing the text is moving but when you place mouse pointer on it stops and when mouse pointer take out from that place it again starts moving.
  • Now I will tell you how this happens.
  • We use this onmouseout=start() and onmouseover=stop().
Programming Skills
  • If you want to change the speed we will use scrollamount="number".
  • You can also change the background color by using this bgcolor="color_name".
  • If you want to change font color then use this <font color="color_name"></color>
  • You will better understand all the things by running our HTML code.
HTML Code :-


<html>

<head>

<title>Marquee</title>

</head>
<body>

<marquee onmouseover="stop()" onmouseout="start()" bgcolor="green">

<h1>Marquee</h1>
</marquee>

<center>
<table border="2" width="500px">
<tr>

<th><marquee direction="right" onmouseover="stop()" onmouseout="start()">Sr. No.</th>
<th><marquee direction="left" onmouseover="stop()" onmouseout="start()">Languages</th>
</tr>

<tr>

<td><marquee direction="up" scrollamount="20" onmouseover="stop()" onmouseout="start()">1.</td>
<td><marquee direction="up" scrollamount="20" onmouseover="stop()" onmouseout="start()">C</td>
</tr>

<tr>
<td><marquee direction="down" onmouseover="stop()" onmouseout="start()">2.</td>
<td><marquee direction="down" onmouseover="stop()" onmouseout="start()">C++</td>
</tr>
<tr>
<td height="100px"><marquee direction="right" onmouseover="stop()" onmouseout="start()">3.</td>
<td><marquee direction="left" onmouseover="stop()" onmouseout="start()">JAVA</td>
</tr>
<tr>
<td><marquee direction="left" onmouseover="stop()" onmouseout="start()">4.</td>
<td height="100px"><marquee direction="right" onmouseover="stop()" onmouseout="start()">HTML</td>
</tr>
<tr>

<td><marquee  behavior="alternate" onmouseover="stop()" onmouseout="start()">5.</td>
<td><marquee  behavior="alternate" onmouseover="stop()" onmouseout="start()">CSS</td>
</tr>

<tr>
<td><marquee  behavior="scroll" onmouseover="stop()" onmouseout="start()">6.</td>
<td><marquee  behavior="scroll" onmouseover="stop()" onmouseout="start()">ASP.NET</td>
</tr>
<tr>
<td height="100px"><marquee  behavior="slide" onmouseover="stop()" onmouseout="start()">7.</td>
<td><marquee direction="scroll" onmouseover="stop()" onmouseout="start()">Programming</td>
</tr>
<tr>
<td><marquee behavior="scroll" onmouseover="stop()" onmouseout="start()">8.</td>
<td height="100px"><marquee  behavior="slide" onmouseover="stop()" onmouseout="start()">Skills</td>
</tr>
</marquee>
</center>

</body>
</html>                                                                                                                                                  
For more help see the below video :-


If you have any doubt you can ask by commenting on our post.

For more updates like us on Facebook.

Saturday, August 3, 2013

[Part-6] HTML : List Creation

If you have not read previous posts of HTML then you can go here and read them for better understanding.

In today's post I will tell you about how to create list using HTML. There are three types of list :-

  1. Order List.
  2. Unordered List.
  3. Definition List.

Now see below steps to create these lists :-

  • First open notepad or notepad++.
  • We <ol> </ol> for order list, <ul> </ul> for unordered list and <dl> </dl> definition list.
  • Inside we <ol> </ol> and <ul> </ul> we will use another tag named as <li> </li>.
  • But in <dl> </dl> we will use <dt> </dt> and </dd> </dd> in place of <li> </li>.
  • In <ol> </ol> and <ul> </ul> we write matter between <li> </li>.
  • But in  <dl> </dl> we write matter between <dt> </dt> and </dd> </dd>.
  • Then write or copy and paste the below given HTML code.
  • Now save it as anyname.html.
  • Now run it in browser.
  • After running it you will know the difference between these three list.

HTML Code :-

<html>
<head>
<title>Lists</title>
</head>
<body>

<h1>Order List</h1>
<ol>
<li>C</li>
<li>C++</li>
<li>JAVA</li>
</ol>


<h1>Unorder List</h1>
<ul>
<li>HTML</li>
<li>CSS</li>
<li>ASP.NET</li>
</ul>


<h1>Defination List</h1>
<dl>
<dt>Programming Skills</dt>
<dd>C</dd>
<dd>C++</dd>
<dd>JAVA</dd>
</dl>


</body>
</html>

Output :-


For more help see the below video :-

Friday, August 2, 2013

[Part-5] HTML : Table Creation

In today’s post I will tell you about how to create table using HTML.

Follow the below steps to create the table using HTML :-
  •  Creating table using HTML is not difficult.
  •  For table creation we use <table></table> tag and <tr></tr> , <td></td>.
  • We also use table’s attribute named as border to give border to the table.
  • Write or copy and paste the below given HTML code in notepad or notepad++ to create table.
  • Save as anyname.html
  • Now open with any browser.
HTML Code:-

<html>
<head>
<title>Table</title>
</head>
<body>
<h1>Creation of Table.</h1>
<br>
<p>Below is table created using HTML.</p>

<table border="2">
<tr>
<td>Serial No.</td>
<td>Courses</td>
</tr>
<tr>
<td>1.</td>
<td>HTML</td>
</tr>
<tr>
<td>2.</td>
<td>CSS</td>
</tr>
<tr>
<td>3.</td>
<td>ASP.NET</td>
</tr>
</table>
</body>
</html>

Output :-


For more help see the below video :-


If you have any doubt post in the comment box.

For more updates like us on facebook.


Wednesday, July 31, 2013

[Part-4] HTML : Inserting Image

Today I will show you how to insert image on webpage using html.

We can insert the image using given below syntax :-


  • <img src="url/source" alt="Any Text" width="Image Width" height="Image Height">
  • In src we have to write the address of the image, alt give information about image when image doesn't load successfully,width and height is used to give width and height to the picture.
  • Copy the below code in notepad or notepad++ to see how it work's.
HTML Code :-

<html>
<head>
<title>My First HTML Page</title>
</head>
<body>
<h1>Way to insert image on a webpage.</h1>
<b><i><p>Below is a image :-</b></i></p>

<img src="https://blogger.googleusercontent.com/img/b/R29vZ2xl/AVvXsEg7XDtQAFwTc6tkVB1E0gXiFbxsCWTvrLcI_h2RrDrw2SShzBT0KFqgg2cC6x7wky_dx_9s77_aMhXQy0NUXOox5NoibyHbycz00i0v1muKTCJBQkCf1Jo17brZiXxmUFOFvRogY2Tkqbs/s320/engagelikeusonfacebook.jpg" alt="Programming Skills" width="500px" height="500px">
</body>

</html>


For more help see below video :-


Tuesday, July 30, 2013

[Part-3] HTML : Hyperlink Tutorial


In this part I will tell you about HTML Hyperlink.

What is hyperlink and how to add hyperlink?


  • Basically we can say that hyperlink is a word or it can be an image on which when we click we jumps up to the another page for example below is a hyperlink when you click on it you will jump to another page.
  • Hyperlink Click on it.
  • We can add the hyperlink using the below syntax.
  • <a href="url">Any Name</a>
HTML Code :-

<html>
<head>
<title>Use of Anchor Tag</title>
</head>
<body>
<h1>Use of Anchor Tag</h1>
<br>
<p>In this tutorial you will learn that what is hyperlink and how to add the hyperlink?</p>
<hr>

<!-- Below is a hyperlink -->
<a href="http://programmingskills.blogspot.in">Complete Programming Tutorials</a>
</body>
</html>


Now see the below video to learn the use of hyperlink :-


Monday, July 29, 2013

[PART-2] HTML : Tags


Read my previous tutorial of HTML for better understanding of HTML

Today I will tell more about HTML tags and there uses. In my  previous tutorial of HTML I said that there are some tags which doesn't need closing tag  such type of tags are called unpaired tags or self-closing tags for example :- <hr> and <br>.


Now we will discuss some HTML tag :-


  • <h1></h1> this tag is used to show the heading,  we can define this tag from <h1> to <h6>, priority of <h1></h1> is higher and <h6></h6> is less.
  • <hr> this tag is used to create the horizontal.<br> this tag is used to create line break.
  • <!-- Comment --> tag this is used to define comment, anything written in this tag will not be displayed on webpage.
  • <p> this tag is used to create the paragraph.
  • <b> this tag is used to give bold style to the text.
  • <i> this tag is used to give italic style to the text.
HTML Code :-


<html>

<head>
<title>My First HTML Page</title>
</head>
<body>
<h1>This is written using the heading 1 tag.</h1>
<h2>This is written using the heading 2 tag.</h2>
<h3>This is written using the heading 3 tag.</h3>
<h4>This is written using the heading 4 tag.</h4>
<h5>This is written using the heading 5 tag.</h5>
<h6>This is written using the heading 6 tag.</h6>
<br>
<p>Before this br tag is used for line break and this paragraph is written using the paragraph tag.</p>
<hr>This horizontal line is create using the hr tag.

<i><b><p>In this bold and italic tag is used</b></i></p>
<!-- This tag will not be displayed on webpage -->
</body>
</html>


Now see the below video to learn the use of these tags :-


Sunday, July 28, 2013

[PART-1] HTML : Introduction

In first part I will tell you a little bit about HTML after that in other parts I will tell more about HTML.

Requirements to learn HTML :-
  • You can use notepad or better to use notepad++ download it from here.
  • Then install it or if you want to use notepad press Win+R a window will appear in that window type notepad and hit enter.
  • Now you are set to write your HTML coding.
First HTML program :-
  • Open notepad or notepad++.
  • In that write or copy the code as shown below.
<html>
<head>
<title>My First HTML Page</title>
</head>
<body>
<h1>My First HTML Web Page</h1>
<p>This is my first web page created using the HTML</p>
</body>
</html>


  • Now press ctrl+s and save as anyname.html or anyname.htm better to save as anyname.html.
  • Then open the file you save using the browser.
  • Now you will get output as shown in below :-

  • In this coding <title></title>show the title of your webpage and it must be placed between the <head></head> and after that other coding will be written in <body></body>, <h1></h1> used to give the heading on the page and the <p></p> is used to write the paragraph.
  • Note that every open tag has a closing tag but there are some tags which don't have closing we will discuss about that tag in second part.
For more help see below video :-


I hope you will like the article if you have any question or suggestion post in the comment box.